|
Removal and Replacement Instructions
(steps 21-30 of 40)
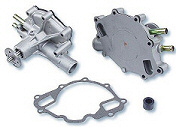
- Re-install the water pump onto the engine (timing chain cover) using the 7 (16mm) bolts/studs. Make sure you use the longer bolts (ususally 2 of them) in the correct locations. Also, one of the bolts/studs has a smooth shaft and serves as the alignment pin for the A/C-PS bracket (see picture below). Be sure and replace it in the correct position. Tighten the bolts in a cross-pattern sequence to make sure the pump seats evenly. Re-check the tightness of all the bolts before proceeding.
.jpg)
- Re-attach the A/C-PS bracket. Slide the bracket over the alignment pin and re-install the 3 (14mm) mounting bolts (see picture below). These bolts are long and pass into the head. Getting them aligned can be a bit tedious. Take your time and make sure not to cross-thread them. Spraying a light coat of WD-40 onto the bolt threads beforehand can make the re-install process easier.
.jpg)
- Re-install the lower radiator hose. If the lower radiator hose is old or showing any signs of bulging or softness it is recommended that you replace the hose. Slide one of the hose onto the water pump and the other end onto the lower radiator opening and tighten the hose clamps on either end of the hose.
- Re-attach (2) heater hoses connected to the water pump. One is a short "elbow" and the other is a longer hose/line that is attached by a clamp by one of the altrnator mounting bolts.
- Re-install the upper alternator mounting bolt (13mm) which also secures the heater hose.
NOTE: The next few steps cover re-installing the water pump pulley, the serpentine belt, the fan/clutch assembly and the fan shroud. It can be a frustrating task getting everything lined up properly
since you can't see much once all this "stuff" is back in place. If you follow the steps below carefully it will make the process go a little smoother.
- Place water pump pulley onto water pump and re-install one of the (11mm) mounitng bolts. Tighten it only enough to make the pulley sit flush against the pump shaft.
- Re-install the serpentine belt. Note the belt routing which is shown on a decal under the hood of your particular vehicle (see example below). Remove the single pulley mounting bolt being careful to leave the pulley aligned with mounitng holes on the water pump (the serpentine belt will hold the pulley in place).
.jpg)
- Place the fan/clutch assembly inside the fan shroud and slide the assembly back in place being careful not to bump the water pump pulley.
- Re-install the 4 (8mm) bolts securing the fan shroud to the radiator.
- Carefully place the fan/clutch assembly on the water pump shaft. Apply some thread-lock (Loctite®) compound to each of the 4 (11mm) bolts securing the fan to the water pump and re-install the bolts. Install the top-most bolt and tighten (hopefully the holes in the pulley are still aligned with the holes in water pump shaft mounting flange). Using a 15mm socket, loosen the serpentine belt so that you can rotate the water pump pulley 45 degress and install the next bolt. Repeat this process untill all 4 bolts are installed.
|