|
Removal and Replacement Instructions
(steps 21-30 of 60)
- Move the fuel rail assembly (with injectors attached) to the right side of the engine bay leaving the fuel supply and return lines attached.
.jpg)
- Remove the alternator belt by using a ½" socket drive inserted into the belt tension pulley. Turn the pulley to swing it and loosen the belt. No need to remove the belt fully just get it off of the alternator so that the alternator can be removed.
- Disconnect the spark plug wiring separators from the bracket just above the alternator. You don't have to remove the individual plug wires. They can be move aside to remove the alternator in a later step and moved aside to install the new intake later on in the process.
- Remove the (3) bolts from the bracket above the alternator (2 short, 1 long).
- Disconnect the (3) alternator connections (1 bolt, 2 plugs) and remove alternator loom anchor from manifold. The loom is "taped" to a T-shaped plastic mount that plugs into a hole in the front left of the intake manifold. Save the plastic mount for re-assembly.
- Loosen the (2) alternator mounting bolts below the alternator and lift the alternator out and set it aside. The alternator mounting tabs are "notched" so you don't have to remove the mounting bolts completely. Just loosen them enough to slide the alternator up and out.
- Disconnect heater hose from rear of manifold (hose clamp).
- Detach the wiring loom from the rear of the intake manifold. It is "taped" to a T-shaped plastic mount that plugs into a hole in the back of the intake manifold. Save the plastic mount for re-assembly.
.jpg)
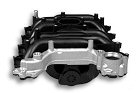
- Remove the (9) bolts securing the intake manifold. The right-rear bolt will require a short socket and a small ratchet (we used a palm-sized ratchet).
- Remove the old intake manifold and gaskets. Take care not to drop debris into the intake ports or F.I. bosses.
|
.jpg)
.jpg)

