Amazon.com Widgets
Autoclinix.com
Google
 
Web www.autoclinix.com

Ford Crown Victoria / Mercury
Grand Marquis Tie Rod Replacement Instructions


Introduction

The following is a step-by-step guide for replacing the front tie rods on your Ford 1994-2004 Crown Victoria and/or Mercury Grand Marquis. The instructions would probably also be equally applicable to a Lincoln Towncar from the same years but this has not been verified. This is not a difficult job by any means and most folks with even modest mechanical ability would pile right in even without instructions. That said, even if you're an accomplished do-it-yourselfer we have documented the process and some of what you'll find in these instructions might save you some time and headache. Although not designed to be completely exhaustive in nature (i.e., idiot-proof), anyone with even the most modest mechanical skills and some relatively common tools should be able to readily accomplish the procedure described. That said, your front suspension is a critical componenet of keeping your car safe and roadworthy. If you read through the described procedure before beginning and get concerned about your skills to accomplish the task then take your car to a reputable repair shop (if you can find one) and have them replace your tie rods with quality replacement parts. If you do decide to take on this procedure yourself please drop us a line and give us some feedback on the content of this site. We're always trying to improve our content and we love getting feedback from fellow Do-It-Yourselfers

Getting Started

Replacing your tie rods usually involves three basic suspension components; inner tie rod end, outer tie rod end and the adjusting sleeve. Tie rod ends are essentially a ball-joint design that connects your cars steering linkage to the wheel spindles. Over time they wearout and cause your car's steering to feel "loose" and can create vibrations and "clunking" in your car's front suspension. It's generally a good idea to replace the inner and outer tie rod ends at the same time. If you try to go the cheap-O route and just replace one end we'd question your manhood and call you names behind your back. The original adjusting sleeve can be re-used if it's not bent or overly rusty. We chose to replace all 3 components on our test car since cost of the sleeves is minimal and since our test car is almost 10 years old and has over 100,000 miles on the original tie rods.


Replacing the tie rods is a straight-forward job and you don't need too many tools to accomplish the task. As with all repairs, read through the instructions first, take your time and be careful. Working under a car is an inherently dangerous activity. Always make sure to use a jackstand in addition to a floor jack when working under a car. Let's get started....

Tools & Supplies

This is one of the simplest procedures on Autoclinix and it does not require many tools. Although the list is short, if you have the necessary tools at your side when you need them it will save you some time.

Tools & Supplies You'll Need...
  • Floor jack or bottle jack AND a jackstand.
  • 3/8" or 1/2" drive ratchet (1/2" drive preferably)
  • 18mm socket or wrench
  • Large-face hammer or mallet
  • Pliers
  • Flat-blade screwdriver
  • Lugwrench
  • Pickle fork(s)

Ford / Lincoln / Mercury
4.6L Intake Manifold Repair
Crown Victoria / Grand Marquis
Lower Ball Joint Replacement
Crown Victoria / Grand Marquis
Front Speaker Upgrade
Crown Victoria / Grand Marquis
Rear Speaker Upgrade
Crown Victoria / Grand Marquis
Front Brake Rebuild
Crown Victoria / Grand Marquis
Rear Brake Rebuild
Crown Victoria / Grand Marquis
Tie Rod Replacement
Ford 4.6L Intake Air Control
(IAC) Valve Replacement
Ford / Mercury / Lincoln
OBDII PCM Trouble Codes

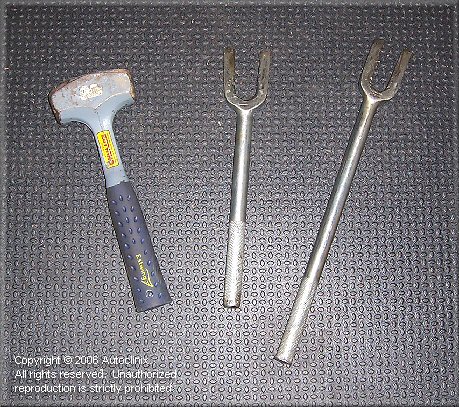
One of the less-common items you will need is a set of pickle forks (see picture below). These are used to seperate the outer tie rod end from the spindle and inner tie rod end from the center link. You can find them at auto parts stores (often times on the "cheap tool table" or at places like Harbor Freight). You'll also need a good size (weight) hammer to use the pickle forks effectivly. We used a 3lb "drilling" hammer (kind of small, hand-held sledge hammer) and it worked well because it has some weight to it and a large striking face. If you don't have this type of hammer (or some other heavy, large-face hammer) your might want to get one. They make the job a lot easier and less likely that you'll accidently hit your hand, cuss and have to get your wife to drive you to the emergency room, etc.
Replacement parts...

You will also need new tie rod ends (and optionally adjusting sleeves). There are variety of opinions on which brand(s) of parts to use and whether or not to use OEM (Ford) parts. There are definitely a large number of knowledgable repair people who strongly believe that many OEM Ford suspension parts are better-made and last longer than many if not most of the aftermarket replacement parts. For example, many mechanics who service Crown Victoria police and fleet vehicles often prefer OEM Ford parts becuase in their experience they just last longer and hold up better.

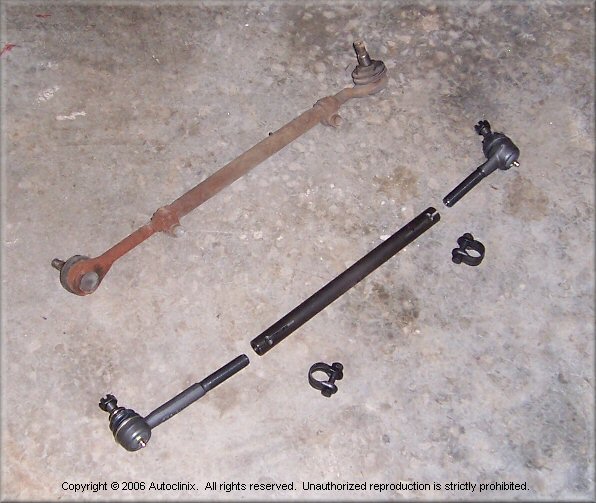
Having said that, Ford does not actually make tie rod ends (or ball joints, etc.) they source them from companies like TRW, Moog, and others. These same companies sell tie rod components through your local auto parts stores. Also, the OEM Ford parts do not have grease fittings and thus cannot be lubricated (or re-lubricated) during the life of the part. Almost all aftermarket parts do have grease fittings and can be "lubed" regularly to help increase their lifespan. As such, we chose to use some aftermarket TRW-brand parts from our local auto parts store. The TRW components came with grease fittings and have a lifetime replacement warranty. See picture below of the old and new tie rod components:

In summation, we would recommend using name-brand repalcement parts (like TRW) with grease fittings or use OEM parts from Ford. In general, stay away from no-name store-brand parts or the "value-line" parts. There's a reason they cost less than name-brand parts and have shorter warranties.

Looking Underneath...

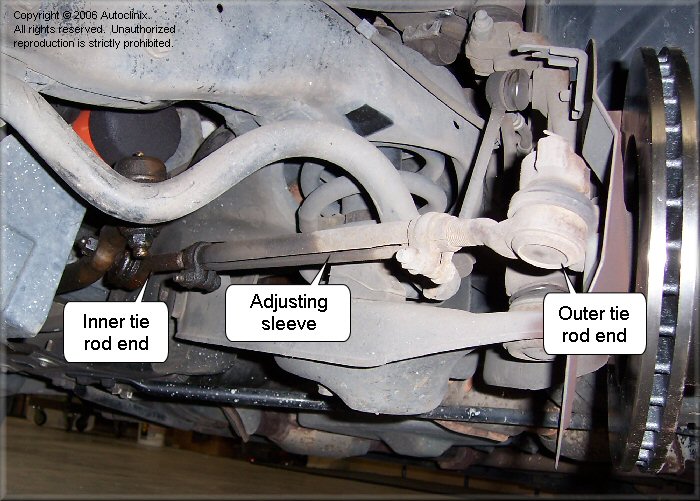
The picture below shows the "before" picture of our test car's driver-side tie rod. The basic tie rod components are labeled.


Back to Autoclinix.com

Next  

Copyright © 2005-2015 by AutoClinix. All rights reserved. Unauthorized duplication in whole or in part is strictly prohibited.