Introduction
The following is a step-by-step guide to removing and replacing a failed water pump on 1994 to 1997 model Ford Econoline Van with either a 5.0L or 5.8L V8 engine. The procedures should also be useful for repairing 1987-1993 model year E150/E250 vans as well as Ford F150/F250 pickups equipped with the 5.0L or 5.8L engine. The procedures outlined and the accompanying photographs cover the repair process from start-to-finish.
 Although not designed to be completely exhaustive in nature (i.e., idiot-proof), anyone with even modest mechanical skills and some relatively common tools should be able to readily accomplish the repair described. If you read through the described procedure before beginning and take your time performing the repair you can potentially save yourself hundred's of dollars in repair labor by doing this one yourself. If you do decide to take on the repair described here please drop us a line and give us some
feedback on the content of this site. We're always trying to improve our content and we love getting feedback from fellow Do-It-Yourselfers
Although not designed to be completely exhaustive in nature (i.e., idiot-proof), anyone with even modest mechanical skills and some relatively common tools should be able to readily accomplish the repair described. If you read through the described procedure before beginning and take your time performing the repair you can potentially save yourself hundred's of dollars in repair labor by doing this one yourself. If you do decide to take on the repair described here please drop us a line and give us some
feedback on the content of this site. We're always trying to improve our content and we love getting feedback from fellow Do-It-Yourselfers
It is assumed at this point that you have clearly determined that your water pump does indeed need to be replaced. Before getting started, inspect the upper and lower radiator hoses first just to make sure it's not simply a ruptured hose. There are two heater hoses as well that might be leaking but you'll need to remove the air-intake system before being able to inspect these (if you are working on a F-150 pickup you can inspect the heater hoses without removing anything). Having said all that, if your van (or truck) is leaking coolant from the front center of the engine you probably have a bad water pump. The water pump has a weep hole in its shaft that is designed to leak slowly (or weep) when the pump seal is failing. If it's leaking it needs to be replaced pronto.
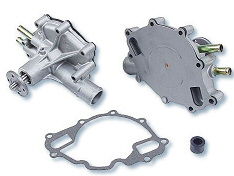
This particular Ford water pump design also sometimes leaks due to gasket failure. This design has 2 gaskets; one between the pump backing plate and the timing chain cover and one between the pump and the backing plate. It's not uncommon on this design for one of the gaskets to be leaking even when the pump is not bad. In any event, you have to perform essentially the same procedure whether it's your pump or just your gasket(s). Given the level of effort to perform this procedure (especially on a van) we recommend replacing the water pump even if the problem is only a leaking gasket (unless you're just especially confident your old water pump is going to last a good long while).
|
Getting Started
The first thing you will need is a replacement water pump. You can get new or rebuilt units for less than $40 at any major auto parts store. We chose to go with a new pump versus rebuilt one because the there was
less than $10 cost difference and it came with a longer warranty. That said, the cost of this repair, if you hire someone to do it for you, is mostly in the labor so a warranty on the pump doesn't do you much good
unless you plan to do the the work yourself. The water pump comes with new gaskets; there are 2 of them on this design. You'll also need to buy some gasket dressing / gasket sealant if you don't already have some.
If you water pump has been leaking for an extended period of time you may also need a new timing chaing cover as the sealing edges can get corroded and the new pump may not seal properly.
Below are some possible sources for the parts you may need...
|
|
Tools & Supplies
You can save yourself some time and frustration if you get the tools and supplies you'll in order before you get started on the actual repair work.
Most of the tools you'll are common-place and you probably already have them in your toolbox. There are no special tools required for this repair.
|
|
Tools & Supplies You'll Need...
|
|
- 8mm socket
- 13mm socket
- 14mm deep-well socket
- 15mm socket
- 16mm deep-well socket
- 11mm wrench (shirt-shaft preferably
- 3/8" drive ratchet
- 1/2" drive ratchet
- Palm-sized combo 1/4" - 3/8" drive ratchet (highly recommended)
- 3/8" drive extension
- Flat-blade screwdriver
- Gasket scraper
- One tube of gasket dressing / gasket sealant (hi-tack type recommended)
- One tube thread lock (Loctite®) compound
- Antifreeze (2 gallons)
- A 2-3 gallon drain pan (or bucket)
|
|
Caution -
Make sure that the engine is completely cool and that there is no pressure in the cooling system (radiator) before starting this repair.
|
|
|
Looking Under The Hood...
The picture below will help you familiarize yourself with some of the components you'll be working with. These are pictures from a 1994 Ford E150 5.0L but the items look similar on many of the other models. Some newer models may have an additional plastic cover or "shroud" that hides the top of engine. Once removed, you'll see a similar picture to the ones below.
.jpg)
|
|
|

Back to Autoclinix.com
|

Next
|
Copyright © 2005-2019 by AutoClinix. All rights reserved. Unauthorized duplication in whole or in part is strictly prohibited.
|